Managing product data is one of the biggest challenges for design and engineering teams. With so many files, revisions, and people involved, it is easy for things to get messy and cause delays.
That is where SOLIDWORKS PDM (product data management) comes in. It helps you organize, track, and control every stage of your design process so your team always knows what to do next.
In this article, you will learn what SOLIDWORKS PDM is, its states and transitions, and some best practices that can help you manage your workflow better.
What Is Product Data Management?
Product data management is a system that helps you create, save, review, and edit files connected to product design and engineering.
Think of it as a central hub where all your 3D design renders, CAD files, technical specifications, and bills of materials are stored and easy to access.
An administrator can define permissions so the right people are assigned the right level of access, making it simple to control who sees or changes each file.
For example, you might need to verify a design drawing before it moves to the next stage of development.
With PDM, that process is clear and traceable. This setup reduces errors, keeps everyone working on the latest version, and helps teams across departments stay aligned.
By having a structured way to manage product data, you gain more confidence in your work and maintain higher standards throughout development.
Introduction to SOLIDWORKS PDM
SOLIDWORKS PDM is a cloud-based suite that helps product design teams work more efficiently by managing design files, documents, and data in one secure place.
It gives you the option to store, track, and check every design file so you always know who made a change, when it happened, and what workflow transition it went through.
The system supports collaboration by letting teams select permissions, assign rights, and enter details that move projects forward.
With the SOLIDWORKS PDM administration tool, you can add users, set target workflows, and mention steps that are required before a file moves to the next stage.
This control makes it easier to link workflows across departments and keep projects organized.
Here are the three SOLIDWORKS PDM packages available:
- SOLIDWORKS PDM Standard: A data management application built for smaller businesses working at a single site. It offers core tools and can be upgraded later to Professional.
- SOLIDWORKS PDM Professional: A scalable system that integrates with Microsoft Office and third-party CAD applications. It supports larger teams with advanced file and data management.
- SOLIDWORKS Manage: A record-based system that extends PDM functions. It allows distributed teams to coordinate projects, control data, and share updates across organizations.
What Are Workflow States and Transitions?
In SOLIDWORKS PDM, each workflow has states and transitions that show where a file is and what must happen next.
Workflow States
A workflow state represents a specific step in the lifecycle of a file. For example, you might have states called “Initiated,” “Waiting for approval,” or “Approved.”
Each state allows you to assign permissions to users or groups, giving them rights to perform actions such as checking out files, adding notes, or updating revision numbers. You can even override permissions from previous states when needed.
When you build a workflow in the workflow editor, a state appears as a box with an icon and status indicators. All new files added to a workflow start in the initial state, and there can only be one initial state.
If a file is added but never checked in, it remains in a private state that no one else can access. Once you check in that file, it is assigned a category and workflow and becomes visible to other users.
Workflow Transitions
A workflow transition shows how a document moves from one state to another. Common names include “Submit for Approval” or “Request Change.” These transitions are visible in the workflow editor as arrows between states, with labels and icons that explain the action.
There are three main types of transitions.
A normal transition moves a file when one user runs it. An automatic transition sends the file to a new state without user action. A parallel transition requires multiple users to approve before moving forward. Parallel and automatic transitions are only available in PDM Professional.
You can also set workflow conditions to define which files can pass through a transition, such as file type or variable values.
On top of that, you can add transition actions like sending notifications, asking for authentication, or updating variables when a document moves.
For instance, you might configure an action that assigns a revision number and records who approved the file.
How to Create a Workflow in SOLIDWORKS PDM?
Building a workflow in SOLIDWORKS PDM gives you more control over how files move through your process.
Here is a simple step-by-step guide you can follow to set up yours:
- Open the administration tool: Start by opening the SOLIDWORKS PDM Administration tool and going to the Workflows section. This is where you manage and create workflows for your vault.
- Create a new workflow: Right-click on “Workflows” and select “New Workflow.” A dialog box will appear where you can give your workflow a name and an optional description. You can also define conditions that control which files enter the workflow based on things like file type or path.
- Set the initial state: When the workflow editor opens, you will see the default state called “Initiated.” Rename it to match your process and assign access rights to specific users or groups. This is the starting point for all new files.
- Add more states: Create additional states to reflect the stages of your process. For example, you might add “Under Editing,” “Waiting for Approval,” or “Released.” These states show where a file is at any given time.
- Define transitions: Transitions are the actions that move files from one state to another. Add transitions such as “Submit for Approval,” “Approve,” or “Reject.” You can also configure transitions to trigger things like notifications, permission changes, or revision updates.
- Add automation: To make your workflow smoother, embed actions or conditions into transitions. This could mean sending an automatic notification when a file is submitted or updating a revision number after approval.
- Save and test your workflow: Once finished, save your workflow. Then test it by checking in files that meet and do not meet the workflow conditions.
Best Practices for Implementing a SOLIDWORKS PDM Workflow
An efficient SOLIDWORKS PDM workflow helps your team stay organized, avoid mistakes, and move files through each stage of design with less effort.
When you plan carefully, you create a structure that supports collaboration instead of slowing it down. Here are some tips you can follow to build workflows that actually work for your company.
Keep Workflows Clear and Simple
When you create a new workflow, avoid making it overly complex. Too many steps or conditions can confuse users and delay progress.
Instead, focus on clear stages like “In Progress,” “Under Review,” and “Approved.” This makes it easier for each group in your team to understand their role.
You can always modify the workflow later if your process grows more advanced, but starting simple helps everyone adapt faster.
Use Automation Without Overloading
SOLIDWORKS PDM gives you automatic options to speed up your processes.
For example, you can add notifications that alert reviewers when a document is ready for approval. Or you can configure the system to send a file to the next stage without manual effort.
The key is to use automation wisely. If you set too many automated steps, you risk overwhelming the vault with tasks that are unnecessary.
Strike a balance between saving time and keeping things manageable.
Standardize With Templates
Templates bring order to your system by creating consistent folder structures and document types. This makes it easier for categories of files to stay organized.
For instance, every new project can generate the same set of folders for drawings, CAD files, and reports.
With standardized templates, you don’t have to modify folder setups each time, and you maintain proper permissions across your teams.
This consistency is especially helpful when new staff join your company, since they can follow the same structure from day one.
Apply Revision Control for Accuracy
Revision control is one of the strongest features in SOLIDWORKS PDM. It tracks every version of a file and prevents outdated data from causing errors.
If someone needs to roll back, they can test or review a previous revision at any time. For example, when a design drawing is updated, the system automatically saves the prior version.
That way, you always know which file is current, and you reduce the risk of confusion during design reviews.
Want to shorten review cycles? Book a demo today and see how CADchat speeds approvals by up to 50%.
Structure Workflows for Collaboration
Workflows are not only about moving files through steps. They also provide a workflow link between departments.
When you structure your workflows clearly, you help engineers, designers, and managers coordinate tasks.
For example, one group can receive an automatic task to review, while another gets notifications for final approval.
This approach keeps communication open and makes collaboration smooth across your company.
Bring Collaboration to Your PDM with CADchat
Your PDM system is great at handling storage, file organization, and version control.
But when it comes to design reviews, collaboration, and keeping non-technical teams engaged, you often end up juggling emails, screenshots, and extra file copies.
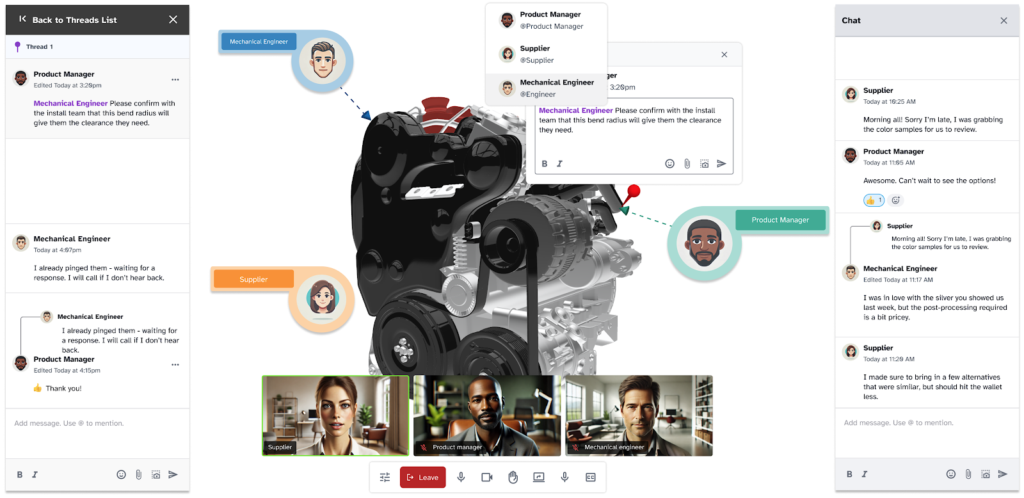
CADchat is a remote collaboration tool designed for product teams that fills the gaps by making collaboration faster, easier, and more transparent while keeping your PDM as the single source of truth.
Smarter Version Control and Change Tracking
PDM already tracks revisions, but confusion happens when files are shared through email or chat. CADchat solves this by attaching every comment and decision directly to the CAD model.
You avoid outdated files or duplicate versions, and edits are logged in persistent workspaces. This complements your PDM audit trail and makes your project history much clearer.
Real-Time Collaboration Without Extra File Copies
Traditional design reviews often require exports, screenshots, or sending static files. With CADchat, you skip all that.
Your team opens the native CAD file directly in the meeting, interacts with it live, and captures feedback instantly.
Your PDM stays the single source of truth while CADchat prevents unnecessary file versions from cluttering the system.
Stronger Engagement for Non-Technical Stakeholders
Most PDM tools are built for engineers, not executives, marketing teams, or supply chain partners. CADchat bridges that gap.
Non-technical stakeholders can view and comment on CAD models without needing specialized software or direct PDM access.
Their input is captured in the same workspace as engineers, which makes design decisions more transparent and reduces the need for repeated explanations.
Anytime Collaboration That Extends PDM Value
Your PDM helps you with structured data management. CADchat extends that value by supporting collaboration at any time.
Teams can leave threaded comments directly on 3D models, making feedback clear and actionable even across time zones.
Discussions stay tied to the file rather than buried in inboxes, which keeps projects moving smoothly.
Faster Issue Resolution and Approvals
While PDM manages the data, CADchat speeds up decision-making. You can run live manufacturability reviews with suppliers, catch issues early, and cut down on costly rework.
Faster feedback loops mean approvals happen up to 50% quicker, and fewer unnecessary meetings reduce bottlenecks in your design cycle.
Ready to maximize the value of your PDM system? Get started today and see how CADchat helps!
FAQs About SOLIDWORKS PDM Workflow
What is a PDM workflow?
A PDM workflow is the path a file takes from creation to approval and release. It defines each step, such as design, review, and final approval, making sure files are managed in a controlled and consistent way.
How does SOLIDWORKS PDM work?
SOLIDWORKS PDM works by storing design files in a secure vault and controlling how they are accessed, edited, and approved. It helps teams collaborate, keeps version history, and makes sure only the right people can make changes at the right stage.
What is the maximum number of workflow states allowed in SOLIDWORKS PDM standard?
In SOLIDWORKS PDM Standard, the maximum number of workflow states allowed is ten. This limit keeps workflows simpler compared to PDM Professional, which has no limit.